It is the time of year to start seeds.
Here are some tips to help you get started.
- Gather and prepare your containers. There are many items you can use to start your seeds in. I have tried a number of ways, and most of them worked out well for me. Egg cartons. Wax covered milk or juice cartons. Carry-out container. Paper, plastic or foam cups. Containers that yogurt or puddings come in. I wash and save them all year and just poke a hole in the bottom of each for water drainage. Used nursery six packs can be reused if they are cleaned well. You can make your own growing containers from empty toilet paper rolls or you can make them from newspaper. Just make sure that they are at least 2 inches deep. All work well.
- Have a water proof tray or container of some sort to put all your seeded containers in. You will need something that will catch the water that drains out of the seed cups. A tote works well for this.
2. Purchase or use seeds you have saved
 Y
Y- 3. You can purchase ready made starting trays from the store that come already filled with starting mix and have a humidity dome. These are the easiest. Just
- wet the soil and you are ready to plant.

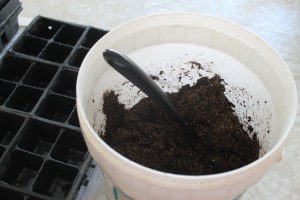
- 4. Make sure you are using a seed starting mix and not regular potting soil. Do not use soil from your garden as it can contain pathogens that can damage your seedlings, Seed starting mix can be purchased by the bag to fill all your starting cups with. It is the ideal medium for seed starting. It is finer and more light weight than regular potting soil and makes it easier for the germinating seeds to break the surface. It actually contains no soil and is comprised of peat moss, vermiculite, coconut coir and perlite. Just moisten, stir and fill your containers. Make sure to tamp the soil down so there no air pockets and there is good soil to seed contact.
-
- 5. After the container is full of soil, poke a hole into the center of each one-I use the end of a pencil-it seems to be about the right size.
- Check the seed packet for information on how deep to plant each seed, usually two times deep as the size of the seed.

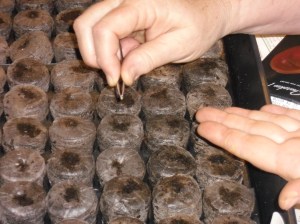
Drop the seeds into each pre-made hole. I use a pair of tweezers to do this as many of the small seeds are hard to handle.
Sow 1 or 2 seeds in each hole. If both of the seeds germinate, just snip off the smallest one with a pair of scissors, leaving the biggest one to grow on. There should only be 1 plant per pot.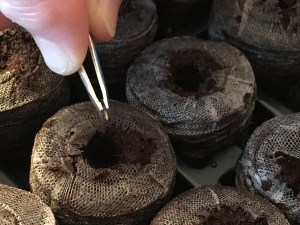
- 6. Pinch the soil up over each planted to seed to cover it.
- If the seeds are very small, just give a thin dusting of soil over them.

- 7. Make sure to label each kind of seed and also note the date sown. My stand-by for marking all the things that I grow is plastic mini blinds.
- Find an old set of mini blinds and cut out the cords. Cut the loose blind pieces into whatever length of marker you need and use a permanent marker to label each variety. These markers will last all year.

- 8. I love the pre-prepared trays that come with a humidity dome. Once the seeds are planted, just cover the tray and that is it. The moisture will stay inside to keep the seeds well watered. If you do not have a humidity dome, you can cover the tray of seeds with plastic wrap to keep the moisture even, but it is not necessary. Light is not needed for most seeds to germinate.

- 9. I also have a heat mat that I use for my seed starting. I consider a heat mat a good investment if you will be starting seeds regularly. You just set the trays of planted seeds on the mat and it will keep the seeds at an even temperature for good germination. If you do not have one, don’t worry. Any warm place will work. Seeds usually like a temp of 65 to 75 degree to germinate.
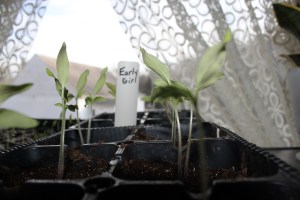
- 10. In just a few days you should begin to see green growth poking up through the soil.
- The seed packet will have information on the usual germination time of each type of seed and some will even have a picture of what a just germinated seed looks like.
- 11. As soon as most of the seeds have germinated, remove the humidity cover. Then remove the seed tray from the heat mat. Immediately move the seeds trays to a bright light location. A window is usually not enough light to
- promote good growth.

- 12. You will need to provide good growing light for the seedings. This usually involves artificial light. The seedlings will grow tall and spindly and lean toward the light if there is not enough light. You are wanting short and stout seedlings. When I was growing plants for the Farmer’s Market, I had a seed starting set up that involved a metal shelving unit with regular shop lights hanging on chains that I could adjust as the seedlings grew taller. The lights need to be just inches above the growing seedlings. Regular shop lights worked fine for me as opposed to more expensive grow lights. I also had the shop lights plugged into a power strip that was plugged into a timer so the seedling received the correct time of light. You will usually be starting seeds when the daylight is less. Seedlings need 16-18 hours of light to grow properly.
- 13. Water the seedlings regularly. They can be watered by bottom watering or use a fine spray bottle with room temperature water. Do not let them dry out, but also do not overwater.
- 14. The first leaves that emerge are not true leaves, but are known as cotyledons. They are actually part of the seed. When the first true leaves emerge-and you should now recognize them as the leaves of the plants you are trying to grow- you can begin fertilizing.
- Use 1/2 strength regular fertilizer once a week.
- 15. As your new seedlings begin to grow, they will need to be potted up. More on that later.
Some vegetable seeds that benefit from early sowing indoors are:
Peppers- 8-10 weeks before last frost
Leeks and Onions-6-8 weeks before last frost
Tomatoes-6-8 weeks before last frost
Eggplant-6-8 weeks before last frost
Broccoli, Brussels Sprouts, Cabbage and Cauliflower-4-6 weeks before last frost